
Do you want to take better food photos? If you want your food blog or food business to stand out, then the photography on your website needs to be as captivating as possible.
Around half of Americans take photos of their food, so it’s no wonder that social media platforms are saturated with these images. Therefore, as a food blogger, you’re not just competing with other food bloggers but the internet, so it’s really important that you take food photography seriously.
You might be worried that upping your food photography game will be daunting or expensive, that you’ll need to hire a professional photographer to take photos of your dishes, or that you’ll need to invest in expensive cameras and equipment to learn how to do it yourself.
The reality is that it’s really easy to take stunning and professional cooking photos just using your smartphone! And in this article, we’re going to give you all the tips and tricks you need to become a pro-level smartphone-wielding food photographer and show you how to elevate your food photos even further when you upload them to your WordPress food blog.
Common Food Photography Mistakes to Avoid
We’re about to share some really essential tips, tricks, and techniques for taking better cooking photos, but it’s just as important to know what not to do when snapping pictures of your dishes. Eliminating basic faux pas gets you well on the way to taking pictures that will make your readers more likely to try your recipes.
Common food photography mistakes include:
Zooming
Zooming in on food on a professional DSLR camera is okay because it has a telephoto lens. Doing the same on a smartphone, though, is not a good idea. It reduces sharpness and depth of field, and it increases image noise, compromising the detail in the photos.
Using the Flash
Using the flash on your phone can cause a host of issues, such as:
- Harsh unnatural lighting that does not reflect the natural colors and textures of the food, making it appear less appetizing
- Odd-looking shadows that detract from the food’s overall appearance
- Off-putting glare on reflective surfaces, such as glass, metal, or wet china, causing additional photo distortion
- A washed-out look that makes food appear duller, greyer, and generally unappetizing
Adding Filters
Lastly, while you might be tempted to add smartphone filters to your food photos, we recommend against them. That’s because filters will change the color, alter the texture, and reduce the clarity of your food photo. They can also distort the image, making it look less like the dish you’ve actually created.
10 Tips and Tricks for Snapping Professional-looking Cooking Photos
So, what can you do to make your cooking photos look more professional with just a smartphone at your disposal? This section takes you through ten food photography tips to improve your skills.
1. Choose the Best Smartphone for Photography
The beauty of smartphone photography is that you don’t need to invest in expensive camera equipment. Most smartphones will do a reasonable job of producing professional-looking photos, so you don’t need to buy a new one for the sake of it. However, if you are looking to upgrade your phone anyway, a few models are renowned for taking really high-quality photos. Smartphones with highly rated cameras include:
- The Google Pixel 7 Pro which has ultra-wide, telephoto, and standard lenses, photo unblur color focus and a guided frame.
- The Samsung Galaxy Ultra S22 which offers a massive 108MP camera, two 10MP telephoto cameras, and a 12MP ultrawide snapper.
- The Apple iPhone 14 Pro, which has a 48MP main camera, second-generation sensor shift optical image stabilization, 100% focus pixels, and a seven-element lens
2. Use Attachable Lenses
If you want to increase the control and quality of your smartphone camera, an add-on lens can help.
An add-on lens is a small, detachable lens that can be attached to a smartphone camera to enhance its capabilities. They typically screw onto a clip or case attached to the smartphone and can be easily removed when not in use. They come in various types, including wide-angle, macro, fisheye, and telephoto lenses, and each offers a different perspective and set of benefits for food photography. Using them makes it easier for smartphone photographers to achieve results that would otherwise require a separate camera. Therefore, they are popular among food bloggers looking to enhance smartphone photography capabilities.
3. Grid Mode
Using grid mode on your smartphone when taking food photos can be helpful for several reasons:
- Composition: Grid mode displays a series of lines on the camera screen that can help you align and compose your shots, making it easier to create visually appealing images. It is particularly useful for food shots, where the composition of plates, table settings, and background is important to create a visually appealing photo.
- Rule of thirds: This rule is a compositional principle that suggests that an image is more balanced and visually appealing when the subject is placed along one of the lines or at the intersection of two lines. This can help you create appealing photos by distributing the elements in the frame more aesthetically.
- Avoiding camera shake: Avoiding camera shake helps you align the camera and keep it level. A slight tilt or movement during exposure can result in a skewed or poorly composed image.
- Improving symmetry: Lastly, try to improve the balance of your images on the left and right as well as the top and bottom. This approach makes it easier to create visually balanced and appealing photos.
4. Use a Stand
A tripod or stand with a mount or holder for your phone is a good investment for any aspiring food blogger, and it can include features such as adjustable arms or legs, tilting and panning mechanisms, and other accessories.
The benefits of using a stand include:
- Stability: Stands provide a stable platform for your smartphone, allowing you to take sharp, well-composed photos without worrying about camera shake or instability.
- Angle control: Stands are also adjustable, letting you control the camera angle, and making it easier to take overhead shots, angled shots, and other creative compositions.
- Lighting control: Stands make it easier to control lighting in food photography. By elevating your smartphone, you can reduce unwanted reflections and shadows and create a more evenly lit image.
- Consistency: Stands let you take photos from the same angle and with the same lighting each time. This can be especially useful for documenting the step-by-step process of your recipes.
5. Nail Your Lighting
The next key to successful food photography lighting is to avoid harsh, direct light that creates strong shadows. Aim to use soft, diffused light that evenly illuminates the food and creates a natural look.
You can achieve this type of lighting through several methods, including:
- Natural light: Soft, natural light from a window can be an ideal source of illumination for food photography. The soft light helps to create a natural look, avoiding harsh shadows and washed-out colors.
- Artificial softbox lights: If you don’t have access to good natural light, softboxes mimic the effect of natural light. They can be adjusted to control the intensity and direction of the light, allowing for greater control over the final image.
- Diffusers: Diffusers can be placed over a flash or artificial light source to soften the light and reduce harsh shadows.
- Reflectors: Reflectors can be used to bounce light back onto the food, filling in shadows and creating a more even and balanced illumination.
6. Consider Color
Color is another important consideration when taking cooking photos because it greatly impacts the overall visual appeal of the photo. Some color considerations that should be taken into account include:
- Complementary colors: Pairing colors that match enhances visual appeal and makes food images look more appetizing.
- Background colors: You can also try including contrasting food colors to make the food stand out and look more vibrant.
- Color temperature: Color temperature refers to how warm or cool the tone of the photo is. A warm color temperature is a good choice for food photography.
- Saturation: Saturation is the intensity of the colors in the photo. We recommend a moderate saturation level, as over-saturated colors can make the food look unappetizing.
- Color balance: Color balance is the overall distribution of colors in the photo. It’s critical to have a balanced distribution of colors to create a harmonious and visually appealing image.
7. Adjust the Exposure (and Get to Grips With Other Settings)
It’s also a good idea to adjust the exposure on your smartphone camera if you have the option. That’s because it helps to control the amount of light that reaches the camera sensor. By controlling the exposure, you can improve the quality of your food photos. Adjusting exposure helps you to:
- Avoid over-exposure – something that can cause the food to look washed out and lose detail.
- Control the background of your food photos, which makes it easier to separate the food from its surroundings.
- Enhance the mood by changing the look or atmosphere of the image.
It’s also important to get to grips with other smartphone photography settings, such as focus, white balance, ISO, and shutter speed. By understanding these settings, you have more control over the final result. For instance, learning to use white balance helps you sense color temperatures and neutralize them to produce more realistic representations of the dishes and recipes you create.
8. Play With Angles
If all your food photos are taken at the same angle, they might get boring quickly, especially if you post a lot of recipes regularly. Knowing how and when to vary your angles is a subtle way of adding variety to your photos, and it will keep your content engaging among your avid readers! Here are a few of the main photography angles you should familiarize yourself with:
- Overhead shot: This angle is taken directly above the dish and is used to showcase the entire plate and its ingredients. It’s a great option for photographing the various steps involved in a recipe.
- 45-degree angle: This angle is shot from slightly above and to the side of the dish and is often used to show texture and depth in the food.
- Eye-level shot: This angle is taken directly in front of the dish. It replicates how the food would look if it were on the table in front of you.
9. Use Props
Props play a crucial role in enhancing the visual appeal of food photography! Popular options include:
- Tablecloths and placemats: These add color and texture to the photo and create a visual separation between the food and the background.
- Dishware: Dishware can complement the food, making it look more elegant. White plates and bowls are popular as they provide a neutral base for the food to stand out.
- Utensils: Utensils and cutlery such as forks, spoons, knives, and chopsticks can give photos of a finished dish a more complete look.
- Garnishes: Adding garnishes, such as fresh herbs or sauces, add color and texture to the photo.
- Linens: Napkins and towels can add a touch of sophistication to the photo and help some elements stand out more.
- Decorative elements: Decorative elements such as flowers, fruits, and other food items can add interest and depth to the photo. It can also make dishes appear more exciting, helping to engage your audience.
10. Download Third-Party Apps for Editing
Photo editing apps can be extremely useful for editing smartphone photography because they offer a range of advanced features and tools that are not available natively on your smartphone. What’s more, most photo editing apps are free! Popular options include:
With Adobe Photoshop Express, for example, you can quickly edit photos using instant color correction features and post on social media with integrated sharing options.
Where to Share Your Cooking Photos
The next step is to figure out where you’ll share your cooking photos. Options include your website or social media, such as your Instagram account.
Sharing your photos on multiple channels is a good idea because it exposes your work to a larger audience of people who will find out about what you do and how your cooking ideas fit into their lifestyles. Remember, some people interested in your food will never leave their favorite social media platform, so you need to post where they are.
You should also consider the type of channel you use for your food photography. Bear in mind that there is a significant difference between a food blog and a social media feed. Food blogs usually contain consistent photos showing all the steps to produce a finished dish, whereas Instagram food bloggers may have more finished recipe photos and more diverse photography styles. Therefore, you may need to take different types of photos to account for the various channels you’ll be using.
If one of the channels you’ll be sharing your photography on is your own food blog, then there’s a lot you can do to boost your images even more. Firstly, food blogging is a competitive sphere, so you’ll want to ensure your images are SEO-optimized to make it easier for search engine crawlers to index your content and rank your recipes in high positions. Therefore, you’ll want to make sure your images are named correctly, aren’t too large, have alt texts, and so on.
How to Present Your Cooking Photos on Your Food Blog Using WP Recipe Maker
It’s also worth bearing in mind social media platforms automate the presentation of your images for you. Instagram uses a small number of layouts to display your photos (most notably the grid layout on your own profile), so it’s hard to go wrong.
On the other hand, uploading cooking photos to your food blog website is more complicated since you need to curate the way your photos are displayed on your recipe posts or landing pages. If you don’t do a good job of this, then you could compromise the user experience on your website. So if you’re just getting to grips with food blogging and want to make sure your images are presented well, what should you do
If your food blog is built with WordPress, then there’s an easy solution: display your recipes in recipe cards using a plugin called WP Recipe Maker. This is a plugin that makes it easy to showcase your recipes beautifully on your blog. Not only does it make your food recipes easier to follow, but you’ll be able to contain images of your finished dish, step-by-step instructions, ingredient images, and more, within your recipe card.
Furthermore, your recipe card will be entirely customizable since you can use the Template Editor to build upon the pre-built templates that come with the plugin; interactive since your readers can adjust serving sizes on your recipe and save recipe collection; and the plugin also handles your recipe metadata to give your recipes a better chance of ranking.
Below are examples of WP Recipe Maker being used to display featured photos as well as instruction photos:

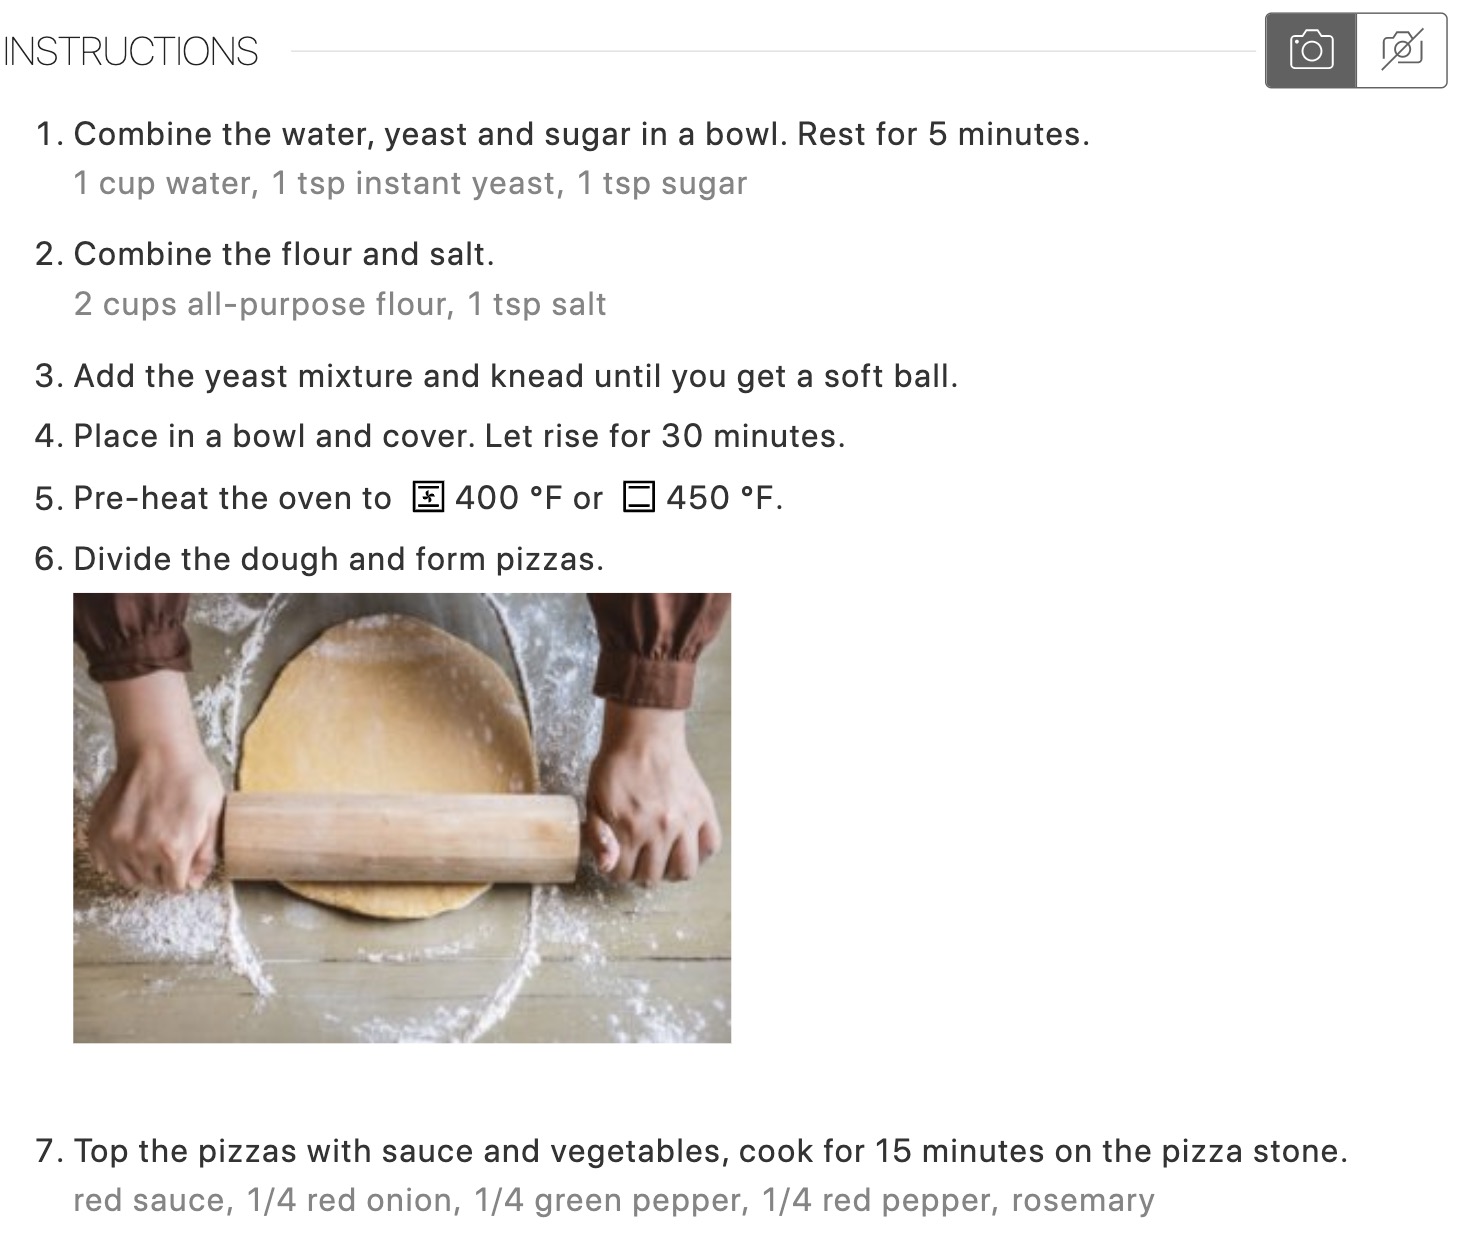
WP Recipe Maker also lets you adjust the size of your recipe image and the size and alignment of your instruction photos. To change the size of your featured image, you need to go to the Template Editor, choose your template, go to Edit Blocks, Recipe Image, and adjust the size.

The best size for your images will depend on the template you use. For example, www.JoyFilledEats.com uses a recipe card template that works best with large images:
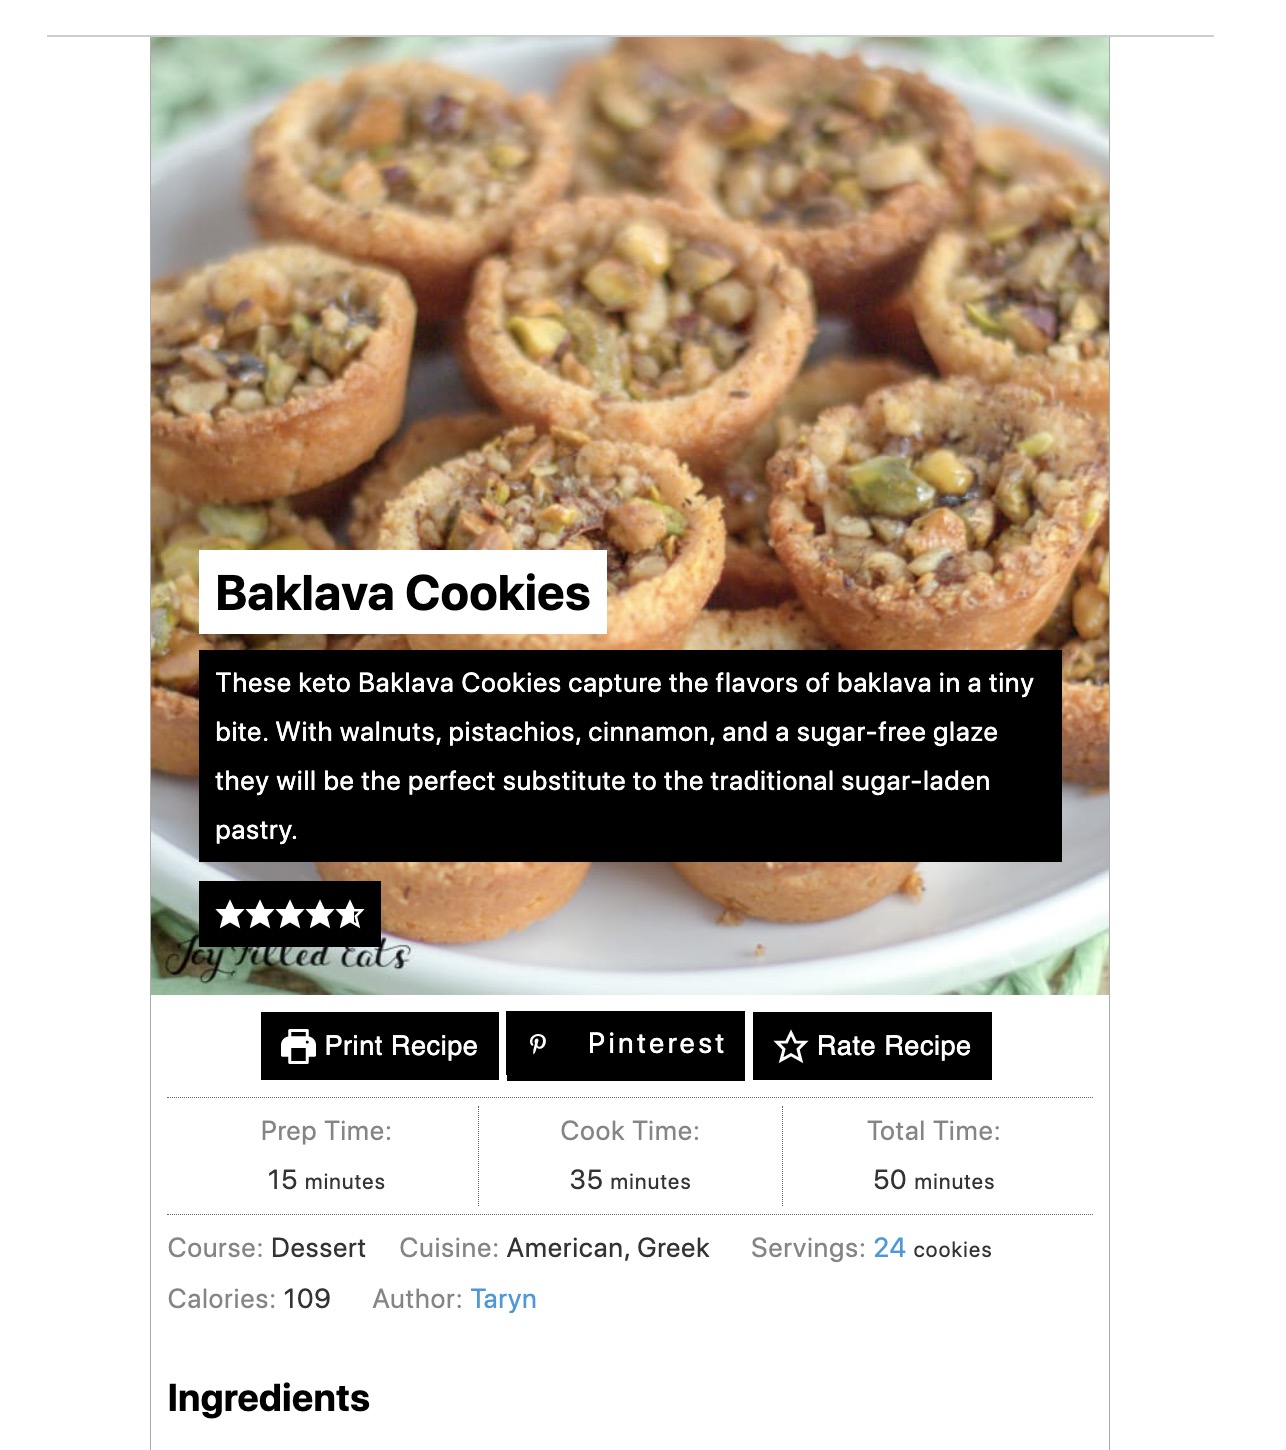
The photo above also illustrates that readers can also pin your recipe images for recipes created with WP Recipe Maker. If you have the premium version of the plugin, you can also set a custom image to pin for the button, so you can include other images that you’re proud of from your photography session for your dish.
Take Professional Food Photos With Just Your Smartphone!
In this article, we’ve looked at 10 tips and tricks for taking high-quality photos of your dishes with just your smartphone. You should now be equipped with the knowledge and confidence to take stunning photos that can be used on any platform, from social media platforms like Instagram and Facebook to your very own WordPress food blog.
If you are running a food blog, then you should consider using WP Recipe Maker to take your food photos to the next level. By creating recipe cards, you can showcase your final dish as a featured photo, and various images to supplement your recipes such as step-by-step instructions as well as equipment and ingredient images. You can also allow your readers to pin your featured photo or a custom photo to their Pinterest board that they can refer back to for inspiration.
Take our smartphone photography tips for a spin, and make sure your food photos really stand out on your food blog by getting WP Recipe Maker!