If you’re reading this article, you already know that WordPress is one of the best platforms for food bloggers. Stats show that WordPress hosts over 60 million blogs, with a large percentage of them being food related.
When setting up a food blog on WordPress, you might be inclined to use the Elementor page builder. Elementor is extremely popular among WordPress users since it gives you more options to tweak your website design using a drag-and-drop interface, templates, and widgets.
Neither the free version of Elementor nor Elementor Pro include a recipe widget, but this shouldn’t deter you if you’re a budding food blogger who wants to have more design control over their recipe website! In this article, we’ll show you how to create a food blog using WP Recipe Maker, a leading recipe plugin for WordPress that integrates with Elementor.
Why use Elementor for your recipe website?
Elementor’s flexibility and ease of use make it a hit among all kinds of WordPress users. In fact, 8.4% of all websites use this page builder, which is millions of websites.
While Elementor’s features aren’t specifically designed with food bloggers in mind, they can most certainly be used to build a recipe website. It also has a few key features that set it apart from the typical Gutenberg editor that WordPress automatically sets all new sites to.
Some of the main reasons to use Elementor for your food blog include:
- A user-friendly interface: Elementor provides a drag-and-drop interface, making it easy to create and customize your website without any coding knowledge. You can visually design your pages by simply dragging and dropping elements onto the canvas. A host of widgets are displayed in the side panel, and you can click on anything from text blocks to titles, images, and so much more. Just drag things into place and start building your site and structuring your pages however you like.
- Pre-built templates: Elementor also has a variety of pre-built templates designed for niches. These are called Elementor Kits and can help you set your site up in seconds. They’re a good way to get started if you don’t know where to begin or need a bit of creative assistance. Of course, all templates can then be customized to suit your brand by changing colors or altering a few key design elements. There are various Elementor kits available that are intended for food blogs.
- Advanced styling options: With Elementor, you have extensive styling options available at your fingertips. You can customize fonts, colors, backgrounds, spacing, and more, ensuring your food blog looks visually appealing and unique. The real-time editing feature allows you to see the changes you make instantly. For instance, if you want to add text to your site, you can click on it and change everything from the typography to the text stroke and shadow.
- Responsive design: The Elementor plugin also lets you create responsive websites for mobile devices. This is crucial for food blogs, as many of your audience members will look for delicious recipes on their phones. They could be in the kitchen looking for tutorials, meaning your site has to be optimized for mobile SEO, or you could miss out on valuable traffic.
- Third-Party integrations: The true brilliance of Elementor lies in all the add-ons you can call upon. It integrates with a diversity of third-party plugins and tools, adding to the functionality. You can integrate social media sharing buttons, email subscription forms, recipe cards, and so much more. All of these things can take your food blog to the next level, and we’ll explain how to integrate the WP Recipe Maker plugin to create Elementor recipe cards in this blog.
Which version of Elementor do you need for your food blog?
If you’re interested in getting Elementor, you can choose between the free plugin and Elementor Pro.
In theory, Elementor Pro is the better option as you get more widgets, WooCommerce integration, theme elements, and loads of templates. It’s only $59 per year for one site, which is great value for money too.
However, it’s not essential, especially for food bloggers. Elementor Pro may have all the features you need to create a great food blog and share recipes around the world, but it lacks one key element: a recipe widget. So, unless you desperately want the other widgets and features included, it could be a waste of money.
You can also find third-party add-ons that extend Elementor, usually consisting of widget packs. Sometimes, you can find one that includes a recipe card option, but we don’t think this is the way to go. Considering that this would be just one widget out of many, it’s unlikely that you would have very advanced options for creating recipes with that third-party widget.
Overall, we recommend sticking to the free Elementor plugin and integrating with a dedicated plugin that lets you do one thing, which is creating recipes, very, very well.
Introducing WP Recipe Maker for Elementor recipe sites
WP Recipe Maker is a hugely popular, five-star rated recipe plugin for WordPress websites. It’s free to download and provides a vast range of features for food bloggers to create delicious recipes.
WP Recipe Maker comes with fully-customizable templates so you can make your recipe cards look perfect and professional. It also boasts SEO optimization, meaning your recipes are easier for people to find online. There are so many other features, too, like the ability to add a recipe printing button to the card or create adjustable serving sizes to suit your audience.
Benefits of using WP Recipe Maker for Elementor
- Seamless integration with Elementor: WP Recipe Maker integrates with Elementor and gives you a widget to drag and drop recipe cards onto pages. There’s also a Recipe Roundup widget that shows an overview of the recipe, letting people click it and see the whole card.
This plugin also lets you create recipes in two ways; directly in the Elementor editor or via the WP Recipe Maker dashboard. Additionally, the dashboard is a fantastic place to manage all of your recipes.
- Lots of pre-set and customizable templates: You can stick to the pre-set recipe card templates, and get stunning results, or you can create totally unique recipe templates using the Template Editor. Some customizations you can achieve include changing the border style and recipe card layout. When you settle on the best template for your website, it can be saved and replicated again and again for consistent recipe cards. Having recipe cards in the same format is perfect if you want to make a WordPress cookbook for your audience to read.
- Advanced personalization: With WP Recipe Maker, you can personalize each recipe with features such as cooking temperatures, adjustable ingredient quantities, equipment information, and more. Bear in mind that the available features will depend on the plan you purchase.
- JSON-LD structured data: WP Recipe Maker automatically handles your recipe metadata using JSON-LD structure data, which should make it easier for your recipes to rank and display in search engine results.
- Enhanced user experience: Several elements can be added to your recipe card to improve the user experience. You can add a button to let readers print your recipes, or you could allow readers to adjust serving sizes so they’ll know the exact amount of ingredients they need. Nutritional facts will let readers know if your recipe fits their daily macros, while recipe ratings will assure readers that your recipe is worth making.
Choosing the right WP Recipe Maker plan
There is a free version of WP Recipe Maker that works perfectly fine for a lot of food bloggers. You still get Elementor integration via a widget, plus the ability to create loads of awesome recipe cards. However, you can also opt for a more feature-packed plan which will give you more options to stand out from other food bloggers:
- Premium Bundle at $49 per year: This plan delivers more customization options, such as adjustable servings, nutrition labels, and user ratings. It also lets you add new elements to your recipes, like a kitchen timer, equipment links to earn affiliate income, and a call-to-action button.
- Pro Bundle at $99 per year: Here, you get everything in the premium bundle with nutrition API integration to automatically calculate nutrition facts, built-in unit conversion, custom recipe fields, and more.
- Elite Bundle at $149 per year: The most expensive plan adds the ability for users to create recipe collections, make a shopping list, and submit their own recipes.
Creating a recipe with Elementor and WP Recipe Maker
In this section, we’ll give you a step-by-step guide to creating a new recipe with Elementor and WP Recipe Maker. Ensure that you have your preferred versions of Elementor and WP Recipe Maker installed on your website!
When both plugins are installed and activated, click on the Add New Page button on your dashboard, and we can begin the tutorial!
Step 1: Switch to Elementor
By default, WordPress will make you edit your new page using the standard WP editor. If you have Elementor installed, you’ll notice a button at the top that says “Edit with Elementor”. Click this, and Elementor will load up.

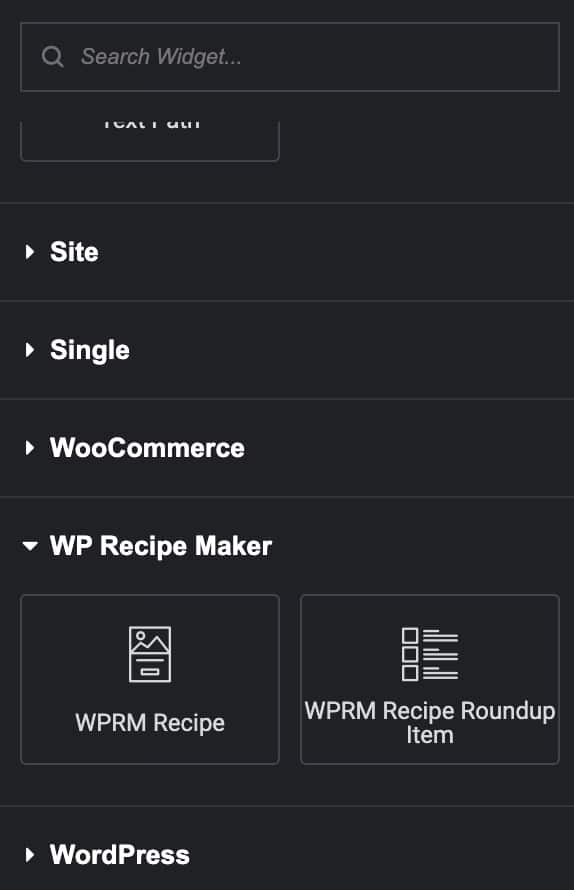
Step 2: Find the WP Recipe Maker widget
The Elementor Editor will have a sidebar on the left full of widgets for you to drag and drop into place. If you keep scrolling down, you’ll come across the WP Recipe Maker section at the bottom. You should see two widgets: one for recipe cards and one for recipe roundups.
Click the one that says WPRM Recipe and drag it onto the page.
Step 3: Create a new recipe
After dragging the widget in place, the sidebar will change, and you will see the option to “Create New Recipe”. Click on this button, and the recipe editor will open up.

Step 4: Fill in the recipe details
The new recipe layout has a host of fields, letting you write a title and description, detail all the ingredients, provide extra tips, and offer steps to complete the recipe.

As you scroll through this page, you can add or remove fields. Depending on the plan you bought, there may be options to add special features like nutritional calculations, etc.
Step 5: Save your recipe
When you’re happy with the recipe, click “Save,” and it will automatically load on the Elementor page editor. Here’s an example of a published recipe from Divas Can Cook, a food blog that uses WP Recipe Maker.

Step 6: Customize further with Elementor
One of the main advantages that you get with using Elementor is that you can leverage its functionality to display recipe cards even better on pages. Access the Advanced tab to refine details like margins, padding, default positioning, and more.
Step 7: Manage your recipes
Elementor is great for creating new recipes and adding them to a page. However, for advanced recipe management, and to customize recipe templates, you’ll need to go to the WP Recipe Maker dashboard in the WordPress backend.
Create stunning Elementor Recipes with WP Recipe Maker
With Elementor and WP Recipe Maker, you can create mouthwatering recipes and captivating WordPress recipe cards that will leave your readers craving for more.
Elementor empowers you to effortlessly build your website by simply dragging and dropping elements wherever you desire. Its user-friendly interface and visual approach make food blog creation a breeze. When you combine it with WP Recipe Maker, you gain access to a plugin that generates fantastic recipe cards in an instant. This powerful duo transforms your website into a stunning platform, offering viewers unique and visually appealing food recipe cards to follow.
Ready to take your food blog to the next level? Explore WP Recipe Maker’s pricing plans today and unlock additional features for your recipe cards. Elevate your readers’ experience with enhanced functionality and make your food blog truly extraordinary.