
If your cakes turn out dense or your cookies bake up tough even when you “followed the recipe exactly,” the problem probably started at the measuring stage, not in the oven. And there are a couple of reasons for this!
Scooping flour straight from the bag can pack in 33% more than you meant. Holding a liquid measuring cup in the air makes your reading way off. And treating brown sugar like regular sugar instead of packing it firmly means you’re adding less than the recipe expects.
Thankfully, these are all fixable with simple techniques. Flour and other powders do best with the spoon-and-level method. Liquids should be in a clear cup on a flat surface, read at eye level. Brown sugar should be packed to fill the cup. Once these become second nature, your baking starts to behave – and the results match what you pictured in your head!
The tools you need for accurate measuring ● Dry measuring cups (flat tops for leveling flour, sugar, grains). ● Liquid measuring cups (clear, with a spout and side markings). ● Measuring spoons (metal, for small dry and liquid amounts). ● Digital kitchen scale (with a tare button). ● Straight edge (back of a knife or offset spatula). These few tools are enough for almost everything you’ll bake. Dry measuring cups are meant to be filled and leveled, which is why they’re the best choice for flour and sugar. Liquid cups are made to be read from the side at eye level, so you pour to an exact line instead of guessing – and that’s also why one cup can’t really do both jobs well. Measuring spoons handle all the teaspoons and tablespoons in between, while a digital scale with a tare button makes it easy to weigh ingredients and reset to zero as you go. A simple straight edge, like the back of a knife, ties it all together by keeping your dry ingredients flat and accurate! |
How to measure dry ingredients accurately
The spoon-and-level method for flour and powders
Flour measuring uses the spoon-and-level method. One cup of all-purpose flour measured this way equals 120-125 grams.
- Stir or fluff the flour in the container so it isn’t compacted.
- Use a spoon to gently fill the measuring cup until it’s slightly overflowing.
- Hold the cup at eye level and slide a straight edge (like the back of a knife) across the top to level it.
Avoid scooping straight from the bag with the measuring cup. That compresses the flour and can add 30-50% more than the recipe expects. The same spoon-and-level method works for powdered sugar and cocoa powder. Getting this right is one of the biggest fixes for dry, dense cakes and cookies that barely spread, even when everything else is correct!
What ‘sifted’ and ‘scant’ actually mean
This is a subtle but important one! When it comes to flour:
- “1 cup flour, sifted”: Measure the cup of flour first, then sift it.
- “1 cup sifted flour”: Sift the flour before measuring, then lightly spoon it into the cup and level. This gives you less flour.
That little comma changes the amount in the cup. A scant cup means just under a full, level cup – think “almost there, but not quite.” A heaping cup means flour mounded above the rim, with no leveling.
For leaveners like baking powder and baking soda:
- Give the container a quick stir.
- Scoop with a measuring spoon and level it off.
- Check the expiration date – old leaveners lose strength, and your cakes won’t rise properly even if you measure perfectly.
How to pack brown sugar correctly
Packed brown sugar is one of the rare times you should press an ingredient down on purpose.
- Spoon brown sugar into a dry measuring cup.
- Press it firmly with the back of the spoon or your fingers.
- Add more and press again until the top is level and solid.
When you tip it out, it should hold the shape of the cup like a little sandcastle – that’s “packed brown sugar.” Some recipes say “lightly packed” for a softer press, but you should still see the shape hold together.
Only brown sugar gets this treatment. White sugar and flour should never be packed. Because brown sugar is moist, loose scooping leaves pockets of air, reducing the sweetness and moisture the recipe intended.
How to measure liquids correctly
Liquid measuring has one simple rule: let the counter, not your hand, hold the cup. Place your clear liquid measuring cup on a flat surface, then bend down so your eyes are level with the markings on the side. Look for the curve on top of the liquid – that little dip is called the meniscus – and read the measurement at the bottom of that curve, not at the edges.
Holding the cup in the air tilts it, even slightly, and that tilt can change the amount more than you’d think. This eye-level method works for all thin liquids, such as water, milk, broth, oil, and juice. For small amounts such as vanilla extract, lemon juice, or soy sauce, use measuring spoons and hold them level. A small trick that saves frustration: pour them over a separate bowl so any overflow doesn’t end up in your batter. Once this becomes a habit, you stop guessing and start pouring exactly what the recipe expects.
How to measure thick or sticky ingredients
Thick and sticky ingredients don’t behave like flour or water, so they need their own tricks. Butter in sticks is the easiest: the wrapper markings tell you that one stick equals ½ cup, so you can just cut where the line is. For butter sold in tubs, press it into a dry measuring cup, smooth the top, and level it off.
Yogurt and sour cream are also used in dry cups, not liquid cups. Spoon them in, tap gently to remove big air pockets, and level the top. Honey, molasses, and maple syrup are the clingy troublemakers. Lightly coat your measuring cup or spoon with oil or cooking spray first, so they slide out cleanly instead of leaving half behind.
Peanut butter and other nut butters are packed into a dry cup and leveled, or skip the hassle by weighing them on a scale and using the tare button between ingredients. Cream cheese works the same way – soften it slightly so you can press it into a dry cup and level the top for an accurate measure.
When to use a scale instead of cups
The choice between cups and a scale comes down to what you’re making, not whether you’re a ‘serious’ baker. Volume measures the space an ingredient takes up. Weight measures how heavy it is. Weight is absolute, which is why a scale removes guesswork when precision matters.
Scales are great for recipes where small changes affect structure, like bread, laminated doughs, and macarons. A little extra flour in those recipes can change how the dough hydrates, rises, or layers. In contrast, careful cup technique works well for muffins, brownies, quick breads, and most cookies. Those recipes are more forgiving and tolerate normal variation without falling apart.
It’s also worth saying out loud that extreme precision is often overstated for home baking. You don’t need to weigh every tablespoon of sugar to get good results. A scale is a tool, not a rule. Use it when accuracy makes your life easier or improves consistency, and rely on well-measured cups when it doesn’t.
How to use the tare function for faster measuring
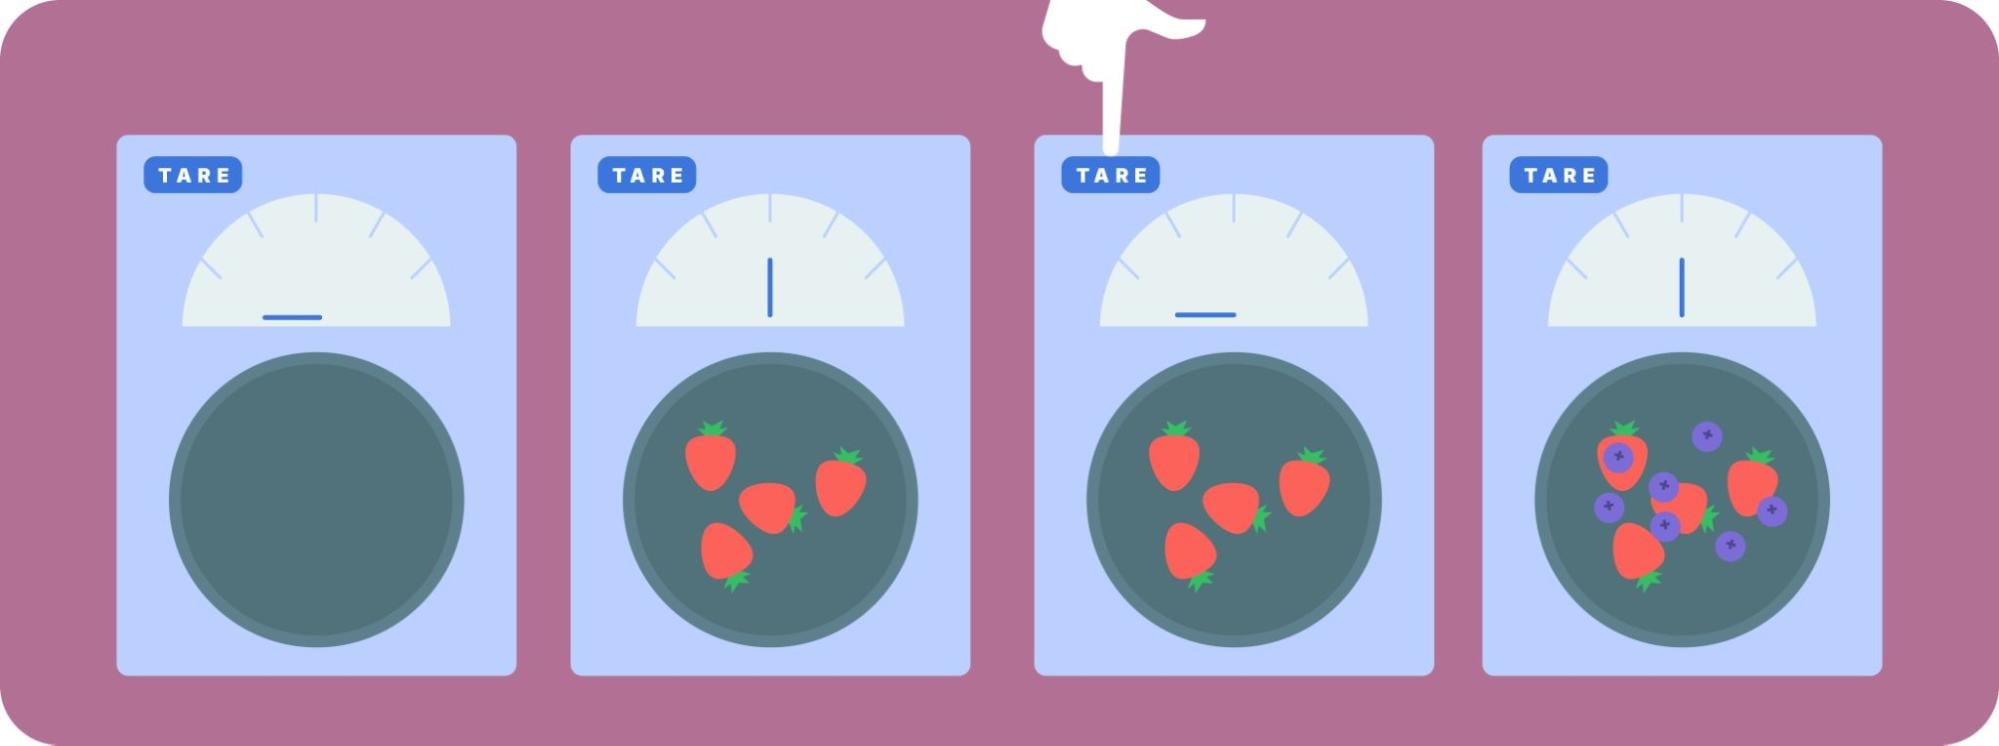
The tare function lets you measure multiple ingredients in one bowl without doing any math. Place your empty bowl on the scale and press the tare button to reset the display to zero. Add your first ingredient, such as 120 grams of flour, then press tare again so the scale returns to zero. Add the next ingredient, like 200 grams of sugar, and repeat the process.
Each time you press tare, the scale ignores what’s already in the bowl and measures only what you’re adding next. You can keep going until every ingredient is weighed. This means one bowl, fewer dishes, and no switching between measuring cups. Once you get used to it, this workflow is often faster than volume measuring because everything happens in the same container, and the numbers do the work for you.
Common ingredient conversions
A cup of all-purpose flour is 120-125 grams using the spoon-and-level method. While helpful, a chart simplifies scaling recipes or verifying measurements.
Common baking ingredients
| Ingredient | 1 cup | Notes |
| All-purpose flour | 120-125 g | Spoon and level |
| Granulated sugar | 200 g | — |
| Brown sugar | 220 g | Firmly packed |
| Butter | 227 g | 1 stick = 113 g (½ cup) |
| Powdered sugar | 120 g | Sifted |
| Cocoa powder | 85 g | — |
Volume equivalents
| Measurement | Equivalent |
| 3 teaspoons | 1 tablespoon |
| 16 tablespoons | 1 cup |
| 1 cup | 240 ml |
Actual weights change slightly based on how you handle ingredients and this matters especially if you’re a food blogger publishing recipes at scale. Flour compacts, brown sugar density shifts with moisture and butter weight changes depending on temperature.
If you’re developing and testing recipes for your audience, using weight keeps your results consistent from test batch to final publish. The classic 3-2-1 rule is based on weight: three parts flour, two parts liquid, one part fat. That precision is what makes it reliable!
And when you suggest swaps, don’t just say “you can substitute.” Point readers to a proper ingredient substitution chart so they can adjust confidently without breaking the structure of the recipe!
How WP Recipe Maker handles unit conversion for you
Scaling and converting recipes is easy with WP Recipe Maker, which addresses the frustration of redoing math after understanding proper measuring technique.
WP Recipe Maker stores ingredient amounts, units, and ingredient names as separate fields instead of one long line of text. That structure enables accurate scaling and unit conversion. When you set up a recipe, conversions are applied per recipe using defined values, and you stay in control of what’s shown rather than relying on blind, automatic recalculation.
Readers can switch between US customary and metric measurements with a single click. Adjustable servings recalculate every ingredient automatically, including on printouts, so doubling or halving a recipe doesn’t introduce rounding errors. You can display conversions as toggle buttons or dropdowns, or show both simultaneously for international readers.
Beyond ingredient amounts, WP Recipe Maker also handles temperature conversions for oven settings and updates the inline ingredient quantities in the instructions as servings change. Over time, this structured setup builds a searchable recipe database that stays consistent as your content grows.
Adjustable servings are available in the Premium, Pro, and Elite bundles. Unit conversion and temperature conversion are included in Pro and Elite. For full recipe creation guidance, see the recipe guidelines.
Measure with confidence and get better results
You now understand where baking goes wrong – and how to prevent it! Measuring isn’t just a step in the recipe but part of the structure that determines texture, rise, moisture, and consistency.
For food bloggers, that structure matters beyond your own kitchen. Clear measuring habits during testing lead to cleaner ingredient lists, more predictable scaling, and fewer reader questions. When your quantities are intentional, your conversions, substitutions, and nutrition calculations become more dependable, too.
Which is exactly why we created WP Recipe Maker!
Because ingredient amounts, units, and instructions are stored separately, your recipes can scale properly without breaking. Adjustable servings update quantities automatically. Unit and temperature conversions keep everything accurate for different readers. And once your recipe structure is set, it stays consistent across your entire archive.
You focus on developing recipes that work. WP Recipe Maker helps you publish them in a way that keeps that accuracy intact.


